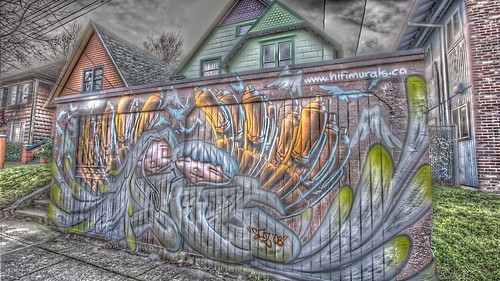
However, there is a neat place up on Belmont where the graff stays up for long periods of time. The artist(s) are wonderfully creative! So when my wife told me that some new art went up, I was excited to see what they'd come up with. If the web address on the art is any indication, the artist(s) hails from somewhere north of the US border. I like Canada. I can see that a wee-trip north to photograph their own streetart could yeild some good images.
My wife and I pulled the Prius up to the curb on the opposite side of the street. The parking space in front of the art was filled with some huge gas guzzling blob. I needed the widest angle lens I had. That wasn't too difficult as I have a 10-22mm f/3.5-4.5 EF-S Canon lens that mounts perfectly to my new 40D.
The scene had a very wide dynamic range. Shadow details were easily 20 stops lower than the exceedingly bright back-lit thin clouds. This led me to the idea of realizing the subject as a high dynamic range tone-map. I set the 40D's automatic exposure bracketing function for +/-2EV and made sure the shutter would trip multiple times at high speed. The camera was hand held and I wanted as little motion between exposures as possible.
Once captured, I imported three images (one each +/-/0 EV) into an Open Source application called Qtpfsgui. I checked the box that forced an alignment, just in case the three images needed it. The first step yielded a high dynamic range tiff format file. These files tend to be flat looking and really aren't very interesting.
To make the photo "sing", I selected Qtpfsgui's tone map funtion and used the Fattal filter to re-write the tones they way my mind's eye "saw" them when I first took the three photo stack. There are modifiable parameters in the tone mapping software that allow a user to stretch the image re-mapping in several dimensions. Since I have been working with the application for some time it was easy for me to select the parameter values that closely matched my desired output.
After saving the tone mapped image as a jpg, I opened another Open Source application called the Gimp. The Gimp is a great Photoshop-like application that you can use to edit photos. In this case, I used the Gimp to snug up the upper and lower values and to bring down the "shadow" (darker) tones.
I love the way I can go from image capture to finished product in such little time. Add to this the use of Open Source (aka: free, as in no cost) image manipulation software and I'm thrilled with how my image processing has been streamlined.
No comments:
Post a Comment