Continuing my series on portraiture, we will now turn our attention to lighting. Specifically, we will look at strobe lighting. I typically use strobes when photographing indoors under carefully controlled circumstances.
Before we begin, let's revisit my motivation for doing this.
Grand Question -
Looking back 50 years, what would I have liked to have known that would've helped me make better progress swiftly and with more confidence?
This post will attempt to address the lighting part of that question. Again, I would like to propose a cost effective approach that illustrates just how little investment in tools it takes to create wonderful portraiture.
I will start with a simple one light setup. This is something I have tested over the years and is based on the ideas of William Mortensen, Robert Balcomb, and Joel Grimes. I feel these three photographic artists have a lot of great things to say about photography and how to create art through the photographic processes.
Camera Setup -
For the sake of consistency and controlling many of the variables that can come into play I use the following for all my work in a studio and other indoor spaces.
Set the Exposure -
The following assumes you are using your flash/camera combination in the flash's manual mode. This method for correctly setting the exposure is easy to follow. Once the exposure is set and for as long as your camera/flash/umbrella/subject distances do not change, your exposure should not change.
Let's get started with our first lighting setup.
Lighting Setup #1 -
This lighting setup is very useful for not only portraiture, but also fashion and pictorial representation. I don't see this used very often these days, but it gives a very beautiful light.
Note 2: The bigger the umbrella the softer the light. I use an umbrella that is approximately three feet/1 meter in diameter.
Certainly there are other more complex lighting setups a photographer can implement. They will cost more money, of course, for the additional equipment. Such approaches fall well outside my intended scope of low-cost yet beautiful lighting. If you are interested, Joel Grimes gives a very good description of how to use three light systems.
Notes -
Before we begin, let's revisit my motivation for doing this.
Grand Question -
Looking back 50 years, what would I have liked to have known that would've helped me make better progress swiftly and with more confidence?
This post will attempt to address the lighting part of that question. Again, I would like to propose a cost effective approach that illustrates just how little investment in tools it takes to create wonderful portraiture.
I will start with a simple one light setup. This is something I have tested over the years and is based on the ideas of William Mortensen, Robert Balcomb, and Joel Grimes. I feel these three photographic artists have a lot of great things to say about photography and how to create art through the photographic processes.
Camera Setup -
For the sake of consistency and controlling many of the variables that can come into play I use the following for all my work in a studio and other indoor spaces.
- Set the Exposure by using
- Manual Mode (typically "M" on most cameras)
- 1/125th of a second for the shutter speed
- f/5.6 or f/8 for the aperture
- 100 for the ISO (or whichever is the lowest sensor sensitivity your camera offers)
- Daylight for the White Balance
Set the Exposure -
The following assumes you are using your flash/camera combination in the flash's manual mode. This method for correctly setting the exposure is easy to follow. Once the exposure is set and for as long as your camera/flash/umbrella/subject distances do not change, your exposure should not change.
- Set the exposure by taking a photo and look at the histogram of the resulting image.
- In general, if the image is too dark, the histogram levels will "bunch" toward the dark end of the range.
- In general, if the image is too light, the histogram levels will "bunch" toward the bright end of the range.
- Adjust the flash intensity until the histogram of your images shows information recorded in the highlights and shadow areas - making sure the skin tones are neither over-exposed nor under-exposed. Most cameras can show you in-camera the areas that are too dark and too light when reviewing photos you've taken.
Let's get started with our first lighting setup.
Lighting Setup #1 -
This lighting setup is very useful for not only portraiture, but also fashion and pictorial representation. I don't see this used very often these days, but it gives a very beautiful light.
Note 2: The bigger the umbrella the softer the light. I use an umbrella that is approximately three feet/1 meter in diameter.
- Compose your subject by looking at and moving your camera and your subject to exactly achieve what you want the final image composition to be
- Place a single flash/umbrella set-up facing your subject at a distance of two and a half to three feet.
- Move light standard up or down until it is situated just outside and above the field of view of your camera. That is, you can not see the umbrella in your camera's field of view, but the umbrella is as close as possible to coming into that field.
- Set the exposure (see set the exposure description above)
You are now ready to photograph your subject.
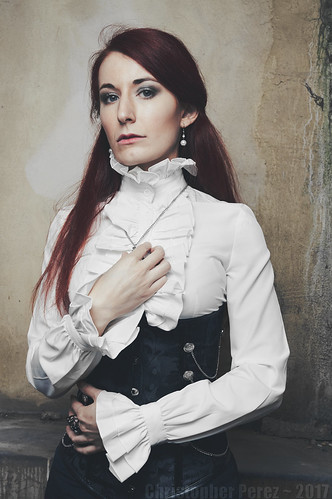
Here is an example of what this lighting setup can do.
Lighting Setup #2 -
This lighting setup is also very useful for portraiture, fashion and pictorial representation. This is the kind of light you encounter most of the time in publications and advertising. It's currently called cross light, or in former times it was known as plastic light. The Grand Masters of paint used this light fairly often (though I have seen a surprising number of Grand Master works where the artist used the kind of light used in setup #1 above).
For this lighting setup you might want to use a black or white surface that subtracts or bounces light into your subject's shadow areas. Using a non-reflective black surface can add drama to an image by helping create deep/dark shadows. Using a white reflective surface can soften the subject's shadow area by bouncing a bit of light into the dark areas. Which way you proceed will be a matter of personal taste. There is no right nor wrong answer. Additionally, I've easily found foam core board at our local art supply that is white on one side and black on the other.
- Compose your subject by looking at your camera and moving your subject to exactly achieve what you want the final image composition to be
- Place a single flash/umbrella 45 to 60 degrees to the side of your camera with the umbrella facing your subject. Set the distance between the flash/umbrella and your subject to three or four feet.
- Move light standard up or down until the umbrella is pointing head height at your subject.
- (optional) Set a non-reflective or reflective surface facing your subject on the side opposite the flash/umbrella.
- Set the exposure (see set the exposure description above)
NOTE 3: When using Lighting Setup #2, if you're not sure which side of the camera to place the flash/umbrella, take a photo and see what the effect is. If it's not what you want, move the flash/umbrella to the other side and try again.
NOTE 4: When using Lighting Setup #2, if you're not sure of the effect of using a black or white surface on the shadow side of your subject, set your flash/umbrella placement, set your exposure, and take several images using black or white surfaces while varying the distance from the surface to your subject, and compare the results.
You are now ready to photograph your subject.
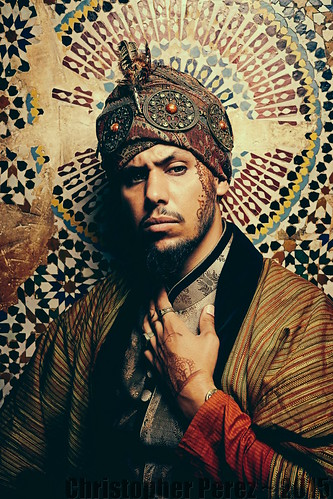
Here is an example of what this lighting setup can do.
Certainly there are other more complex lighting setups a photographer can implement. They will cost more money, of course, for the additional equipment. Such approaches fall well outside my intended scope of low-cost yet beautiful lighting. If you are interested, Joel Grimes gives a very good description of how to use three light systems.
Notes -
I feel it is valuable to repeat the notes that I provided above. For portraitists new to this approach, the details of a shoot can at first be confusing. But with repeated use (dare I say practice?) the value of these notes will be seen.
NOTE 1: Setting the exposure correctly "in-camera" will help minimize the adjustments you make to an image later in processing.
NOTE 2: The bigger the umbrella the softer the light. I use an umbrella that is approximately three feet/1 meter in diameter.
NOTE 3: When using Lighting Setup #2, if you're not sure which side of the camera to place the flash/umbrella, take a photo and see what the effect is. If it's not what you want, move the flash/umbrella to the other side and try again.
NOTE 4: When using Lighting Setup #2, if you're not sure of the effect of using a black or white surface on the shadow side of your subject, set your flash/umbrella placement, set your exposure, and take several images using black or white surfaces while varying the distance from the surface to your subject, and compare the results.
In the next post I would like to talk about the art of portraiture. It turns out buying equipment and learning how to use it is the easy part.
No comments:
Post a Comment